CLICK HERE FOR FREE BLOGGER TEMPLATES, LINK BUTTONS AND MORE! »

Thursday, December 5, 2013

Family Home Evening Board Tutorial

Our church has asked us to hold Family Home Evening every Monday night. This is a chance to teach our children gospel principles and grow closer as a family. I have loved watching my children learn and I have grown to be really excited for every Monday night!!
 
My kids were starting to argue a lot about FHE-I didn't like that! They would argue over who's turn to teach the lesson, pick the treat, etc, etc. I knew I needed a board. And I knew where I wanted it-in a really narrow space! I found this online and loved it!
 
 
This one of course is horizontal and I needed vertical. I realized I had to make one myself. Using this as my inspiration I came up with this:


So here is my tutorial that some of my friends have asked for!

Family Home Evening Board Tutorial:
(Please excuse my low quality pics that I took at night!)


1) Get some wood from Home Depot or a local home store. I used MDF and it worked great! Have them cut it there to the size you want. If you want cute beveled edges like my board find someone in your area that can do that, unless you have a saw that can do that!
 
2) Paint your board! My friend who cut the edges offered to help me paint this and used magnetic paint. It wasn't working well so we gave up-but if you want to put many, many, many coats on you could try it!! I wanted to ensure a strong hold, so opted not to rely on the magnetic paint. Of course we distressed the edges a little for a shabby look.
 
3) Get clear magnetic frames. The ones I got are from Walmart.com and are 4x6 size.

4) Get your vinyl.
 
5) Trace each one of your frames on cardstock and cut out. Take your pieces of cardstock and space them out along your board where you want them. Trace them with a light pencil. Don't forget to account for the vinyl labeling under (or on top of) each frame!!
 
6) Get sheet metal from Home Depot, Hobby Lobby or some other craft/home store. Make sure it's magnetic!!! Cut a rectangle big enough for magnetic frame to attach onto. It doesn't have to be cut perfectly straight or pretty because you won't see it! My hubby used a saw, there are scissors that cut through sheet metal as well.
 
7) Glue metal pieces in center of rectangles you drew on board with glue. I used this:
 
 
Should look like this:


Here is the back of the frame, it comes with the magnet on it already:


8) If you want to decorate your frames now is a good time as the glue will have to set overnight!!!
 

9) Once metal has dried onto wood overnight, put vinyl onto board. I really just eyeball mine. And then voila! You're done!  You could also get vinyl and put it at the top with the title "Family Home Evening" but I didn't have room and did a separate sign for that.
 
My kids LOVE having this board!! They love looking to see who is doing what and changing it out every week. I also love it because it stays "neat" looking all the time unlike the chalkboard options I was looking into. (I know my kids would want to fill it out-and that's okay) but this way it stays put together. And I can change out the pictures as the grow. I got extra frames so if we need to add people we can. It's SO easy! I hope this helps anyone looking for a fun FHE Board craft!
 
~Anna~

Friday, January 20, 2012

Getting the Kid's "Stuff" Organized

The majority of my kid's toys are upstairs. Where I like them. In their rooms. And in their closets. I keep some downstairs, of course.  We have an ottoman bench as a toy box. Filled with toys mostly for my 15-month-old, and other small kids that come over. We also have a train basket-always a huge hit with little boys!

But mostly, what my older kids spend their time doing downstairs is coloring, drawing, playing games, puzzles and crafts. (Not to mention watching tv, movies, playing the computer and Xbox).

So when I was pregnant with my third and not feeling well all the time, I got "their stuff" in the downstair's closet organized, that way I didn't have to get off the couch they could easily help themselves at any time to whatever activity they wished.

It evolved over time. And I have to re-organize it every few months because it gets out of order since THEY are the ones pulling stuff out and putting it away. They know where everything goes.


Here's a pic:


I love labeling things, and I love that my kids are old enough to read labels!!! (Well at least my son).
Each of my two older kid's have a "Homework Box". This has been so helpful! When they come home from school, they pull their homework out and their homework box from the closet. It has pencils, crayons, markers, scissors and glue. Basically everything they will need to finish their homework-all in one box!


Every single puzzle here was bought at the dollar store. It's nice because they are almost all the same sizes. Princess puzzles definitely dominate over the boy puzzles here!


This basket has odds and ends for crafting:


Here's a full picture. Notice how unorganized the top part of the closet is? I imagine that's something like what the before picture for their stuff would look like. Someday I'll organize that stuff too! OH-I almost forgot to mention the "Notebook Basket". That's the basket alllll the way on the bottom. See it?  My kids just throw coloring books, notebooks, pictures-whatever, in it. It keeps it all contained!


Well I hope maybe I was able to give some good ideas in case anyone is stumped out there on how to organize the many crafting items children aquire.  Soon I'll have to blog about how I keep their finished projects organized!

Sunday, September 25, 2011

Crockpot Beef Stroganoff

I made this for dinner a couple of weeks ago and wanted to share!  It was the perfect way to ring in the fall season (even though it’s still around 100 degrees here).  I smelled the wonderful meat cooking all day long.  It was mouth-watering.  I love this recipe because it is SO easy and SO delicious.  Warm and hearty, and my whole family loves it.  So here ya go:
Crockpot Beef Stroganoff
1½ lbs Stew Meat
2 Cans Cream of Mushroom Soup (10oz)
1 Package Onion Soup Mix
1 Container Sour Cream (16oz)
Mix all ingredients (except for meat) in a large bowl.  Put meat in crockpot (I almost always put it in frozen) and pour mixture on top.  Cook on high for 4-5 hours.  Serve over noodles.  I love egg noodles and usually cook some sort of veggie on the side. Enjoy!

Friday, September 16, 2011

Fall Centerpiece

Eeeeeh! I LOVE Fall. Like, really, really, really, really love fall. Did I mention I love fall? What’s not to love? I grew up watching the leaves turn all shades then falling on the ground and crunching under my feet as I would walk to and from school. I would help my Dad rake the leaves on our lawn and make pathways to drive my electric toy jeep through.


Okay, no leaves in the pic, but you get the idea. :)
I love eating chili and warm soups. Baking pumpkin bread, pumpkin cupcakes and anything else pumpkin related. I love taking my kids to local farms and looking at pumpkin patches and petting animals. I love the crisp cool air (as cool as it can get here in Phoenix).
Aside from all that wonderfulness I just mentioned there are two more things I absolutely love about fall:
1.)    HALLOWEEN
I have a slight obsession with Halloween. It’s SO FUN! The candy! The costumes! The scary movies! I met my hubby on Halloween and my first baby was due on Halloween. Not just a coincidence. ;)

2.)   IMPENDING CHRISTMAS
I heart Christmas. So much. Slightly more than Halloween.  I think one of the reasons I may love the fall so much is because of the anticipation of Christmas right around the corner.  So…I’m not a summer girl, can ya tell?

Anyhoo…I couldn’t help myself. I was at Hobby Lobby last Friday and I got inspired.  I bought a few things and used some that I had and made this centerpiece for my kitchen table:


Isn’t it perty??? I love the sparkly pumpkins and sparkly acorns-who am I kidding I just love sparkle! The green gourds add just the right amount of green and who doesn’t love a good red apple?
I LOVE this candle holder.  I change out the candles and décor in it from season to season. For example I have beautiful sparkly fruit I put in it at Christmas time. I’m looking for beautiful white candles to put with the sparkly fruit but haven’t found just the right ones yet.  This piece of décor is also low enough that we can still see each other’s faces when sitting at the table-I don’t even have to move it!

Other than that I put one small fall décor on my front door. I couldn’t help myself, I just couldn’t! Way too excited even though it was only September 9th. But hey, last year I had ALL my fall décor out September 1st. But that’s because I was due to have a baby and wanted to be sure it got put out or I would have not survived the fall season. Okay a little dramatic. It just makes me so happy to see pumpkins, acorns and gourds-oh my!
What’s your favorite piece of fall décor?

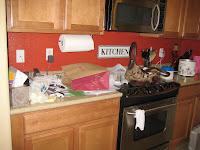
De-cluttering the Counter

My kitchen counter has been the bane of my existence recently.  The mass amounts of papers pile and pile and pile right up.  You know what they are; birthday party invitations, papers that need to be signed and returned to school, outgoing mail, incoming mail, coupon inserts, birthday cards, coupons-AGH!  I’m starting to feel anxiety just typing all that. :)  Well life got crazy. Like reeeeaaaalllly crazy.  As it does from time to time.  Things just got thrown…wherever.  Not only did my counter get piled up, but my pantry, and my office, and…I just couldn’t take it anymore!!!!  One night I kind of had a break down.  Just a small one, didn’t even cry (I don’t think).  Enter wonderful husband.  He said, “We will work on it together”.  And we did.  We spent half a Saturday and got. things. organized.  Hallelujah.  Well at least the counter and the pantry organized. 

One of the changes made (I actually made this change a long time ago but want to share it anyway because I love, love, love it) is that I no longer have a small planner for my calendar.  I used to leave it out on the counter, “where I could always see it”. Ha!  It just got piled on by all the aforementioned crap of papers.  So every time someone would call and say, “would you like to so-and-so on such-and-such date?”  I would scramble to find my stupid calendar. “Um, yeah. That sounds great. Just give me one second…to find my, uh, calendar here…Yes! Okay I am free that day.” 

Well I got tired of that. So I got a BIG wall calendar and hung it in my pantry.  I hung it with a fine point sharpie marker that clips right on and NEVER LEAVES THE CALENDAR. Never people. Really.  Just try to move my calendar pen.  Really try.  ;)  Goodbye tiny calendar that I could never find and never had enough room to write all the activities on.  Hello big, beautiful calendar I can always see and have plenty of room to write all my activities. 


One of things I do with my calendar at the beginning of each new year is sit down for about an hour and write everyone’s birthday that I want to remember.  This includes all my family and my bestie’s.   If you’re on my calendar, you’ll know you’re one of my besties. :)  Anyhoo, I also write a reminder on the Monday before their birthday to buy them a birthday card. Why Monday might you ask?  Well, Monday is the day I do my grocery shopping.  So I know, (mostly) I will be going to the store that day and can pick up a card.  Oh how I LOVE grocery store Monday’s. They make my life, week and home oh so peaceful. (A blog post on that soon to come).

Another change we made was this hook:


My hubby hung up this hook for my son’s backpack and lunch box. I have taught my son when he gets home from school (after taking off shoes outside and emptying sand, wiping feet with a wipe and washing hands) to take the ice pack out of his lunchbox, put it in the freezer. Take his water bottle out of his backpack and put it on the counter. Then…HANG UP THE LUNCHBOX AND BACKPACK. In the pantry. On the hook. Out of my sight. Two less things to trip over, pick up and put away. Thank you beautiful, white, curvy hook that husband hung right at my little son’s level so it’s nice and easy for him. :)

One more thing we did under my lovely calendar, is put a hanging file box that my husband spotted at Target and suggested we get. (Oh how I love that man).  In it I keep “my notebook”. (Probably another blog post to come on “my notebook” someday. I think I would die without “my notebook.” It truly keeps me organized).  Whatever book I’m reading (still working on finding the time to read more). The Book of Mormon, so we can easily grab and read it as a family (still working on that too). And any other important papers that used to be on the counter.  The idea was to get this “stuff” off the counter. And it worked!!  Oh the peace I feel when I walk by and actually see my counter now.


I still need to file some of  the papers that got moved from the counter to the office. I’m working on that. It’s a work in progress.  I’m just so happy to know that everything has a place-and it’s not the kitchen counter anymore!!!  And you know what I think I’m gonna do with the newfound space on my kitchen counter???  Thanks to the brilliant suggestion of my good friend Jenny, I’m going to put a digital photo frame there.  There, where the pile of crap used to be will be a frame that rotates pictures of my children and other loved ones.  Isn’t that much better?  Ah, one small step to creating a home in order completed.  Many, many, many more to go. :)

Before and after pics: